E-commerce tracking is one of the best tools a business can use to get to know their site and customer.
- What products are popular?
- How long do visitors spend on-site?
- How much money do they spend?
These are all questions Google analytics Tracking can help your business to answer. The problem is many don’t know where to begin and are missing out on the best type of online snooping. Whether you get geeky over data or are a complete analytics novice this guide can help you.
Before we get started. I’d like to take the chance to introduce myself to you all. My name is Lynne and I am the newest Maven to join the team. A little about me – I come from a background in fashion, design & marketing. I am very excited to have joined the Maven team and I am looking forward to helping your businesses grow.
And I’d like to start by sharing my guide on how to better track your e-commerce sites data. In my first week working with the Mavens, one of our clients had a problem with e-commerce tracking. With the process below I was able to help a client get to know their e-commerce site inside and out.
Introductions over, let’s get started.
Step 1 – Enable e-commerce tracking in google analytics
Here’s how to check and enable;
- Login to your Google Analytics account
- Go to the admin section (found at the bottom left of screen)
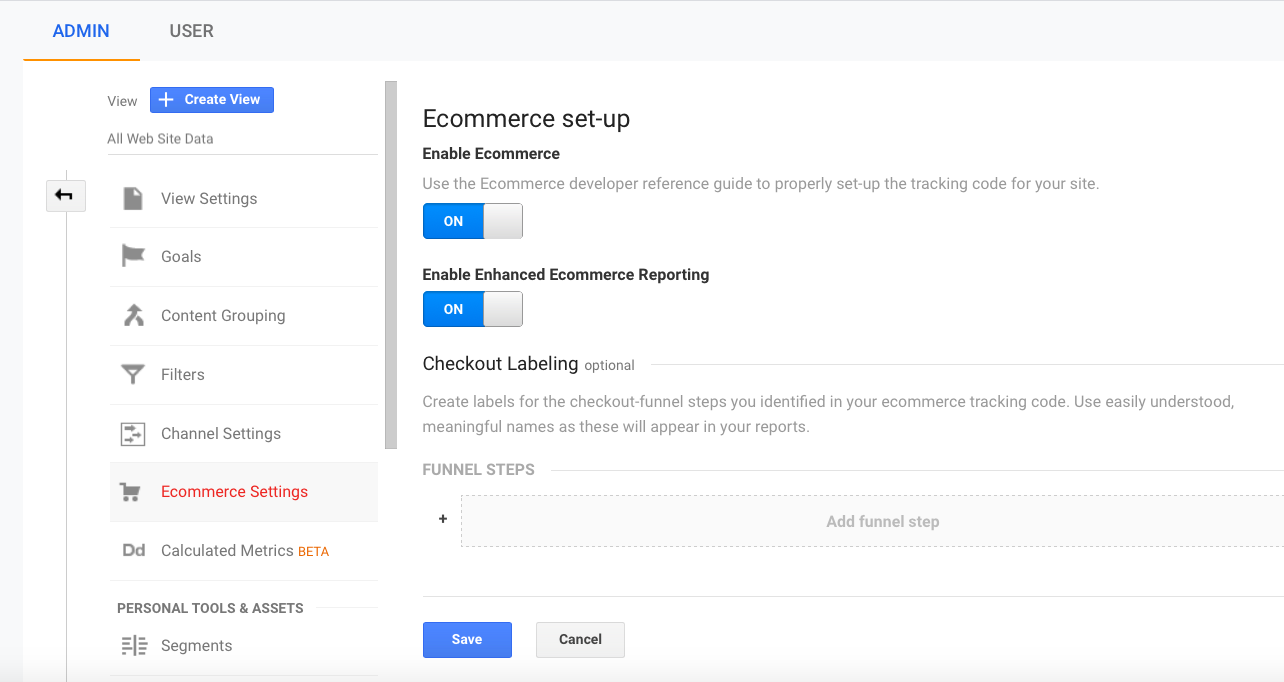
- Then, under the View column (the third column) select e-commerce settings.
- Now turn the ‘Enable Ecommerce’ and ‘Enable Enhanced Ecommerce Reporting’ toggle’s on. (see print screen 1 below)
Click submit.
Print Screen 1 – enable e-commerce

Step 2 – Download Google Analytics plugin for WooCommerce
If you don’t already have the WooCommerce plugin downloaded, you will need to do so before we can go any further. It’s simple to do and only takes seconds, follow the steps below.
- Download the WooCommerce plugin for Google Analytics
- Go to your WordPress site and under admin – click plugins then add new.
- Drag the zip file into ‘choose file’ and click install now. The plugin in will begin uploading, this should only take a few seconds.
- Now, go to your admin settings and click the blue – Activate plugin button.
Step 3 – Integrating WooCommerce and Google Analytics
Once activated, you can now integrate WooCommerce tracking with your Google Analytics account. Go to WooCommerce settings and click the integration tab. Here is where you must paste in your unique Google Analytics UA number.
Not sure what your UA number is? You can find your unique UA number by;
- Logging into your Google Analytics account and going to the admin panel.
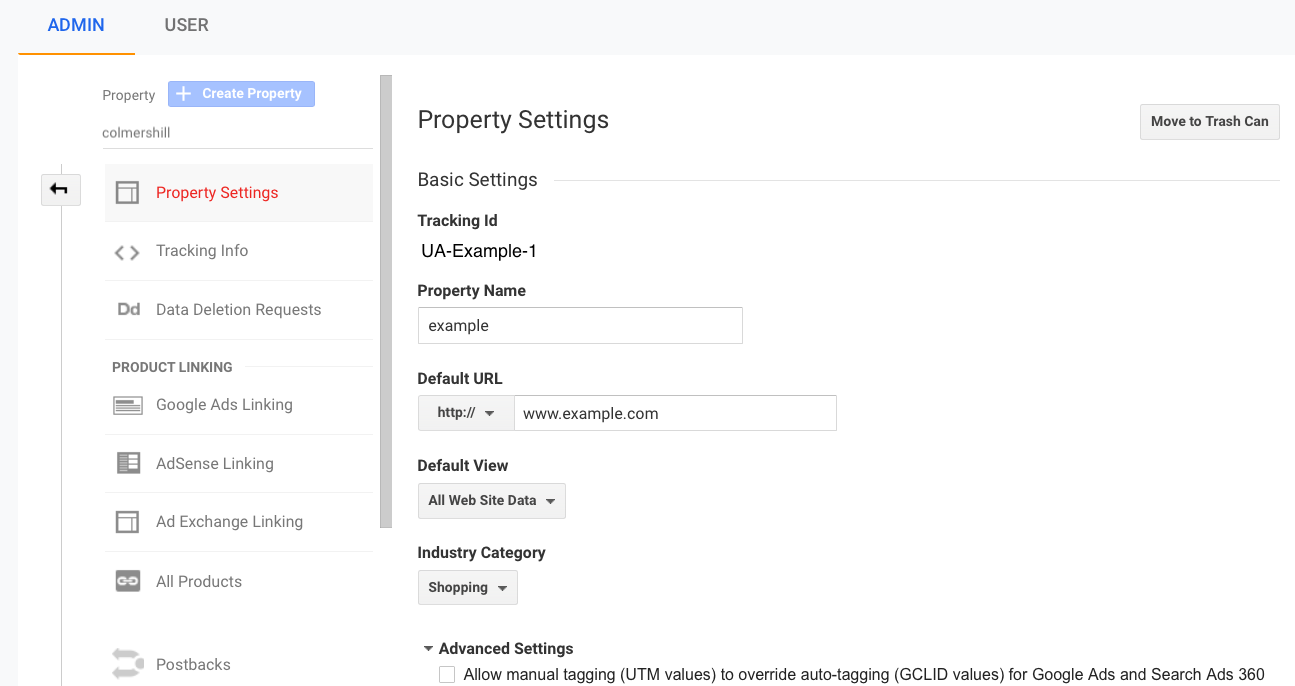
- Then under the property column, click property settings.
- Your UA number will be under ‘Tracking ID’ (see print screen 2 below)
Print Screen 2 – UA number

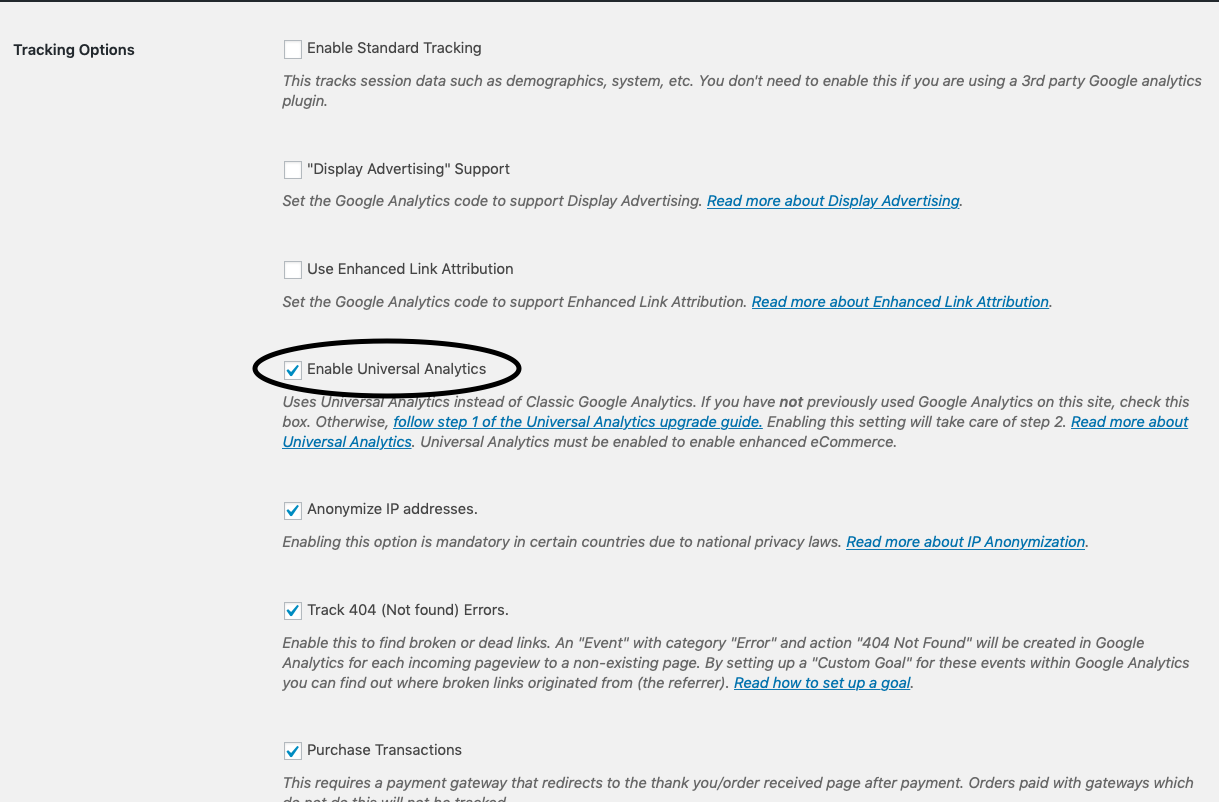
Once you’ve got your UA number, copy and paste into the Google Analytics ID box. Then set the domain name of the site you wish to track. The next step is to check the ‘enable universal analytics’ box. (see print screen 3 below)
Print Screen 3 – WooCommerce tracking options

Once you’ve done this, scroll down and tick all other required fields. (See the list below of required fields, to make sure you aren’t missing out on any important data tracking.)
Required Fields
· Anonymize IP addresses.
· Track 404 (Not found) Errors.
· Purchase transactions
· Add to Cart Events
· Product Impressions from Listing Pages
· Product Clicks from Listing Pages
· Product Detail Views
· Checkout Process Initiated
Once all checked, save changes to your settings and you are all set.
Step 4 – Wait for data to flow through
Once you’ve set up your plugin and enabled all integrations you are ready to go. Data may take up to 24-48 hours to appear on your Google Analytics account and a sale must be completed. After this time and sale, you can head back to your google analytics account and see your tracked data.
Go to: Acquisition – All Traffic – Channels
E-commerce sales data will show on the right-hand side of the screen, under conversions. Here you will be able to track conversion rate, transaction type and revenue. This information is all critical to a data-driven e-commerce strategy.
And that’s it – Four simple steps to integrate your e-commerce tracking in google analytics.
If you would like to get more tips on digital marketing, click here. See how we can help your business grow today.


